Saturday, December 15, 2012

Bee hives dressed for winter in December

Today is mid-December...the 15th.  I checked on the bees yesterday, preparing to give them more fondant.  But the fondant I gave them before is not all gone yet so I think they have another few weeks before they need more.

I also took out the electric fence yesterday and put it in the basement for the winter. I sure hope there are no more bear out there foraging.  In some ways, I wish I had a fence that could stay up all year so that I didn't have to worry about it.  But so far, they are save.  I actually didn't have the battery hooked up for over a week and nothing bad happened.  I didn't dare wait much longer because I was afraid the ground would freeze and I wouldn't be able to get the posts out.

Beehives in mid-December 2012
In the beehive on the right, the bees are at the very bottom...I'm told they are clustered in a little ball.  I saw zero activity so I removed a few frames and put my ear right down into the hive to see if I could hear any activity down there.  Thankfully I did...at least in the big hive.  I'm not as sure about the small hive.  We'll see if that survives the winter.  I'm tempted to put the little one in my greenhouse for the winter where I think it would have a better chance but will see how this winter goes and learn from the experience.

Yard chores during mild December

The conditions were right yesterday, December 9th, to get outside and do work typically saved for spring cleanup. That's because in mid December, it's usually too cold for "spring cleanup".  But yesterday was a mild 50 degrees here in Southern Vermont so I took advantage of it. I began cleaning out an area of my yard that had a lot of downed branches and a few small scraggly trees that fell during excavation and storms.


Here's what the area looked like before the cleanup
Here's the area after cleanup

I burned brush for hours.  This particular area looked especially ugly because it was loaded with the brown, dry remains of ferns.  A metal rake soon had them pulled out and what a difference it made to the area.  I just cleaned out the dead wood and raked up the dead ferns.  Naturally I pulled out rogue wild raspberry or blackberry plants and there was and still is a lot of poison ivy in the area.  I pulled up a lot of it but there plenty more. That's a job I will tackle another day.

I have a lot of Japanese barberry, an invasive plant.  I pulled some of it out earlier this year and am cutting down more in this cleanup. It will be difficult to keep up with unless my neighbor also removes it from his land but I will try my best to keep it at bay on mine.

I may not get another chance this year to work in the yard like it was spring.  I really had the best time..it was so nice to just spend the day outside.

I have plans for the area I'm cleaning out.  It is at the top of my driveway and is really the first thing I see driving up.  I'd like it to be attractive.  I want to move a beehive into that area with some herbs planted around it and line the driveway with lilies or other hardy plants.

Also, there is a lot of shade between the parking area and the area where the beehive will go.  A pathway through the wooded area with shade-loving plants tucked here and there would be lovely.  I'd like to begin that project in the spring.  It would be fun to use just native plants that are sure to thrive. I can't wait for seed catalogs to arrive so I can begin growing plants for this area. Perhaps I can find other native plants from the area and transplant into this area as well. 

It's all part of the fun.


Monday, November 26, 2012

The making of a gingerbread house

I feel like a slacker because I've not been very active with my beekeeping blog.  And this post is not going to be about bees except perhaps mentioned in passing. This post will be about making a gingerbread house with my family.

It all started with some ad on a website and I clicked on it.  It was a very cute gingerbread house that McCormicks had posted.  I remembered when my kids were little, I made a gingerbread house and thought I'd have a nervous breakdown as a result.  Everything seemed to go wrong with that house and I very much was looking for perfection.  While the kids loved it, I don't remember them helping to build it.  I must have started it while they were in school.  Not sure.
completed gingerbread house
So I sent the link to my daughter and we decided to make this one with the kids...they are 8 and 3 and I was hoping for a better result this time.

The making, cooking, assembling and decorating the house took 3 days because large chunks of time are needed between steps in the process.  The directions had to be read very carefully!  That is my advice to anyone who wants to build one of these things.  Read those directions....a lot of pertinent information was tucked into the end in a 'hints' section...so read it all before you start.
I started it by making the dough, created templates using cardboard from the pattern, and cut out the shapes and baked each piece...two fronts, two sides, and two roofs.

After they were cut out, they needed to sit for at least 1 hour to give the dough a chance to expand, (I believe that's why), before cooking.  After they were cooked and just slightly cooled, they needed to be trimmed again, using the template as a guide.  They do lose some shape after they are baked so this is a necessary step. 

You want to get the trimming done quickly because these pieces become so hard, you'd need to sand them down otherwise.  I used a pizza cutter while they were still soft.

The recipe recommended (at the end of their instructions which I almost missed) to pipe in the windows before you assemble the house.  It would have been very difficult to do from an upright angle, especially from someone not skilled in piping frosting such as myself.

The next step was assembling the pieces.  And the assembly needs several hours of drying time so I did this the day before decorating and let it sit overnight to dry.

Start with something they call "royal icing".  This icing gets real hard when it sets.  This is your glue.  I started with the front and side pieces and used a piping bag for the frosting and "glued" the fronts and sides at the corners.  Then this needed to sit for at least a few hours to dry.  (I let it sit for two hours.  Next time, I would double that time, or even let it sit overnight before going to the next step, which is to add the roof pieces)
I propped up the front and sides with various canned goods which were a great help.  Have them within reach before you start.
Gingerbread house propped up while frosting dries
Don't be skimpy with the frosting.  If the corners are not neat and pretty at this stage, don't worry...you will add piping over these corners in the decorating process.

So a few hours into the drying process, the 4 pieces were holding together nicely.  I tested to make sure it wasn't going to fall apart on me.  It seemed fine.  So I began adding the two roof pieces by gluing the peaks together and the top of the sides with a thick ribbon of frosting.  Then, as I was adjusting them into place, the sides fell apart.  I begin shaking.

gingerbread house ready for decorating
Somehow, I got it all put back together with more frosting.  I propped the roof pieces a bit, which the recipe didn't call for, but I wasn't about to take chances of having one, or both, slide off and break.  We needed to decorate it the next day.  So I let it sit overnight.  The recipe said for at least 3 hours.  I wanted it to have even more time to dry.

The next day, itt made the 5 mile trip from my house to theirs and now we're ready to get going on the decorating. Decorating began with making gingerbread cookies and other gingerbread pieces we might want to use on the house.  In the end, only a few of the cookies were used on the house...others were kept for eating.


Melissa adding piping to make the base for candy fence
Frosting piped around the edge provides a base for adding candy fence


gingerbread house front entrance using vanilla wafer cookies, licorice around front door and piece of candy for doorknob. Parchment paper under house is removed at the end.


Tristan thinking creative thoughts.  Also notice the gumdrop candy fence 


What was so fun about this project were how much the kids were involved.  They were participants for hours and I was surprised it held their attention that long.  Especially for the little one. Here they are sitting next to the finished gingerbread house and very proud of their work.  What will be interesting is how this house looks over the next month.  Already that front green marshmellow tree fell down (accidentally on purpose?) and has been eaten! But mother has more of the candy to replenish pieces that disappear over the next month.  It's all part of the fun.

Thursday, November 8, 2012

Winterizing the beehive


Today is November 7th in Southern Vermont.  We have snow in the forecast for tonight so earlier today I tried to insulate my hives beyond the bales of hay surrounding three sides.

I bought a roll of tar paper, or roofing paper, and stapled it around it, leaving just the entrance uncovered.

Then, under the inner cover, I added a piece of foam insulation to hold in the heat.  Then, to channel any water from condensation  down and away from the bees, I tilted the top cover slightly so it would run off.


 I did the same thing for the small nuc hive and tucked it right next to the bigger one.  The bales of hay were put back into place.  Now I think I'm all set with them except periodically checking on food and brushing away any dead bees from the entrance.


fondant for feeding bees
Fondant for feeding bees
While I was in there, I replenished their food (the fondant) and brushed any dead bees away from the entrance on the large hive.
Notice how thick the fondant is. It stays this taffy-like consistency and the bees lick it off.

I also was going to remove the electric fence from around the hives, a seasonal remedy for bears.  I thought they must be in hibernation.  I was wrong.  My neighbor told me the bear visited their suet just a few days ago. So today, I need to get more batteries because I noticed there's no more charge.  I will take care of this today.

Now, a day later, there was no snow here at all.  I saw a few flakes this morning and that's all.  But I'm glad I got the hives set for the winter anyway.

I will get a wreath to decorate it for Christmas and probably leave it up until spring.

Saturday, October 27, 2012

First frosts are a relief

Our first frost here in southern Vermont, at least at my house, was Friday night.  Sometime after midnight probably which really makes it October 13th.  And there was a frost the next night too. So gardens are pretty much gone.

In some ways, it's a relief.  Now I can clean out this year's garden remnants and start with a clean slate in the spring. 

The broccoli survived these two frosts.  As did the kale (no surprise there) and the chard.  Both were covered at night  because I want to eat them as long as possible.

The beeshives are now side by side and protected by bales of hay on three sides.  I will cover them with either plywood of a piece of tin roofing material.  And just hope they survive.


Fall activities for beekeepers and farmerettes

I remember someone in my past calling me a little farmerette.  I doubt it's even a word and should probably look it up. But some days, that's just how I feel.  Well, most days actually :).

Tonight it's going to get cold.  The coldest this season.  Down to around 40 degrees.  No frost yet, but it will feel like it's imminent.  Probably because it is.

I found myself wanting to pick a bunch of flowers, thinking they  may be my last fresh ones in the house this year.  I finally got out and have them on my dining room table.  I will miss their presence in my life over the winter. I dry some to give me some reminders of seasons past but we all know it's not the same!

Autumn does have it's own garden pleasures too...with orange bittersweet wreaths and gourds dressing up a shed or a front door. Pumpkins, fresh apples, indian corn. Mushrooms.  I'll be talking about  mushrooms in another post since I spend a little bit of almost every day hunting them at this time of year.


In the autumn, I rediscover meals like baked beans and biscuits,...last night's meal.  It'll be tonight's meal as well. I tried one of Alice Waters's recipes for pork chops.  So simple.  And so good.

Salt and pepper both sides of a pork chop
leave out for a few hours
Press fresh herb into the sides of the chops (I used rosemary sprigs)
Heat olive oil
fry for 5 minutes over medium heat
flip over and fry another 4 minutes on the other side
let stand for another 5 minutes

I found them to be perfectly done, a bit of au jus left in the pan, and still moist and juicy. Delicious.

Chops went very well with the beans and biscuits.

Wednesday, September 26, 2012

How to make fondant for feeding bees in the winter

I have decided to feed my bees over the winter in case there is not enough honey for them in the hive.

Certainly the little nuc box won't have enough honey so they need to be fed so I will feed both hives and hope they survive the winter.

My plan is to make fondant and I found a bee fondant on Youtube from DC Honeybees that I will try.  Here is the recipe based on that video.

4 cups water in 8 quart pot
Karo syrup (1/4 cup)
juice of 1/2 lemon
8 lbs of sugar

Add karo syrup and lemon juice to the boiling water
Add sugar to pot
Stir and cook until dissolved
Until mixture is 238 degrees (using candy thermometer)
Cool to 180 degrees without touching it at all

Transfer to mixing bowl on Kitchen Aid and begin mixing using wire whisk, low for 15 minutes, then high.
Run it on and off for several hours until it cools down. until it becomes translucent and gooey with the consistency of heavy icing or taffy.

This accomplishes these things:
1) helps to cool it
2) incorporates air to change structure
3) crystals begin to form and mixing it helps keep them small...again, to obtain correct consistency

Add cooled mixture to plastic container to store mixture using one gallon plastic container and let it cool to a consistency so that it won't run out when tipped upside down.

Put the plastic container on top of the top bars of the hive, tip it upside down, with newspaper under it...so bees will eat through it and get to the mixture.  Check to see if it's gone after a few weeks.

The outcome of making fondant

Here we are on October 7th and I finally did make the fondant above and placed it into the hives earlier today.

After rewatching DC Honeybee's video again, I saw a note that said turning the plastic container upside down didn't work out very well so he just put some of the fondant onto a paper plate and put it on the top of the top bars so the bees could get to it easily.  So that's what I did too.

I wasn't sure if I should also put on the inner hive cover now since I also removed the top hive feeder today.  The fondant will replace the sugar water I've been feeding them in that top hive feeder.

So I put it on and will hope for the best!

My fondant seemed to come out as described.  It had the texture of a thick taffy.  The bees were all over it immediately.  I'll check it in a week to see how they are doing. I'm anxious to see how long the fondant will last.  I didn't even use one-quarter of it today.  I would think this quantity would last at least a week and hopefully more.  We'll see.


Friday, September 14, 2012

Part of beekeeping is preparing beehives for winter - Part one

I'll call this post Part One because I'm sure I don't know enough about wintering over my beehives yet.  I still have some studying to do on that.  But last weekend, my friends at imaginethathoney@hotmail.com over in Swanzy, NH came to southern Vermont for our last class.  Wintering over was discussed and you need to prepare the bees for these cold winters here in the northeast.  Here are the steps I learned.

1.  Keep them warm (I will use bales of hay, with a 1 foot air around three sides of the hives and maybe a plywood or other roof).  I picked up 8 bales of hay and hope that will be enough to protect them. I have them in the hive area now, ready to be moved into place when the time is right.

 Move your hives close together to keep them warm.  Mine were only about 4 feet apart so I can move mine a foot or two a week until they are side by side.  I guess the bees get confused and not find their way to their hive if you move it too far too soon.

  Some folks make an insulated ring that slides over the hive (leaving an opening for air and an exit for bees)

2.  Provide the bees with an exit from the hive (they leave hive to go to the bathroom, even in winter)

3.  Plan for condensation that will accumulate inside the hive and if it drips on the bees, you have issues (this is the part I need to figure out as it was new to me). There are various ways to deal with this apparently. I'll get back to you on this part once I've looked at, and understand, the alternatives.

4.  If you have taken too much honey and have not left the bees enough for the winter, then you need to keep feeding them in the winter.  A few weeks ago, toward the end of August, I switched the bees sugar water to a thicker syrup, now two to one.  Two parts sugar to one part water.  On October 1st or so, I will stop supplying syrup.  At that time, it could freeze. So then I will switch to something called "fondant" which is a sugar patty, for lack of a better term, that you place on top of the frames in the hive and that takes the place of the sugar water.  I'll be looking for recipes over the coming days and try to make this fondant myself since I am not sure how much they will need to consume. More on that later.

5.  It's time to put on a mouse guard over the entrance to the hive.  As the weather turns colder, they'll be looking for a home so I believe mine will be going on very soon, if not this morning.  The mouse guard, if you recall looks like this image below with holes large enough for bees to enter and exit, but no mice.


6.  Periodically, I'll need to go to the hive during the winter to clear out any dead bees from the entrance.  Otherwise they could clog up the entrance and living bees wouldn't be able to get outside.

7.  Inspect the hive - I'll need to go in and clear out any comb built where it shouldn't be. And I need to get to the very bottom board to look for any mites, insects or mouse droppings.  I think I got the mouse guard up there before the mice are looking for warmth.  Plus, I have a greenhouse where mice like to nest. I'm prepared there with something to get rid of mice so if I had a choice, I'd rather they go into the greenhouse.
But, that being said, I really wish I didn't need to deal with mice and chipmunks at all!

Monday, September 3, 2012

Local honey from Southern Vermont in 2012

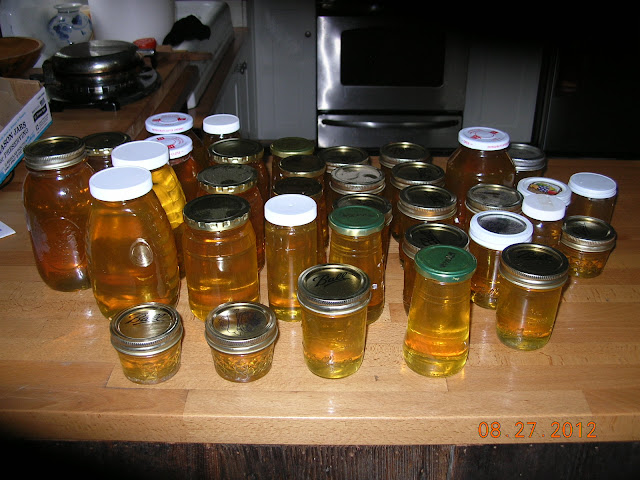
Here is the bottled honey crop this first beekeeping season.  I had been saving jars for some number of months and I thought I had plenty but used them all up quick enough. My grandson helped me bottle the honey and he was pulling them away and adding new ones pretty fast when that honey was flowing into them. Nice job T!  Then I pulled out canning jars too.

I guess I should start saving jars for next year's crop...thinking optimistically.

Next, I need to order beekeeping labels that indicate where the local honey was produced. I'll do this before giving as gifts. I have that order almost ready to place.

Local honey from southern Vermont in 2012

I also need to find more recipes that use honey in place of sugar, or just start by experimenting.  I did read that honey is sweeter than sugar by about 50 percent. So if the recipe calls for 1/2 cup of sugar, I would try using 1/4 cup of honey and see how that works out.  I'll keep this blog informed as I try out some recipes over the coming fall/winter months.

Naturally the blog will change somewhat over these months but I will keep you up to date on bees too but there will be less activity with the bees.  But there is beeswax candles to make and get ready for gift-giving and food to prepare and lotion to make. I also have in mind to use some of my lavender flowers to make a few sachets from drawers...if I ever get to that. We'll see.  Stay tuned.

Fall garden cleanup list

In some ways, it's sad to close up a garden for the winter so I have mixed feelings about it.  I will miss having fresh flowers in the house, which I've had since the first blooms of hyacinths back in April.  I'll also miss the fresh herbs and of course the vegetables and fruits so available in the summer.

But the fall brings a time for cooking!  And fires in the fireplace.  And football. And apple cider with apple cider doughnuts. And more time to read.

This year, with the bees, has been especially busy.  But now is the time I can use up the beeswax and make candles and I have plans to make some calendula body lotion as well, using up the flowers I've been drying and saving for that use. More on that in another post

Here's a list of  fall tasks:
  1. Mow all leaves and bag them and spread them in the vegetable garden to enhance the soil next year.
  2. After the killer frost, cut down annuals or pull them out. (I trim perenniels in the spring rather than the fall so that birds can feed on any seeds and to give more depth to the winter landscape)
  3. Spread mulch on delicate plants
  4. Remove vines from trellises
  5. Dig up some herbs and plant in pots (now is the time to do this), and move them to a cool porch to begin getting them adjusted for the house.  Next step, after a few weeks, will be to bring them in to an inside windowsill.  This year I hope to get some battery operated, stick-on plant lights to give houseplants more light.
  6. Pull pump out of pond when pond plants die off (this can be done as late as November in the Northeast). The pump goes into the basement in a bucket of water to keep the gaskets pliable.
  7. Ensure wood is delivered, cut, split and dry and enough kindling is gathered...and plenty of white birch bark, excellent for starting fires....I actually try to get this done early in the summer so it's ready for fall use but if you didn't do it early, do it  now!
  8. Protect delicate roses or other plants that are most sensitive to the cold - add stakes around them and then wrap burlap around the stakes. Then fill with leaves to insulate the plant
  9. Go to the nursery and buy plants on sale - - great time for bargains as long as you get them planted soon, the fall is a great time to plant...and nurseries are trying to get rid of their stock so there are bargains out there.  In the spring, for example, you can buy a boxwood that is about 6-8" high for about $7.00.  This weekend, I bought two that were double that size for $4.00 each.  
  10. Move a few plants to the greenhouse or coldframe, if you have one, to extend your season.  I have 3 tomato plants there and my pepper plants. I also started more lettuce and cilantro in there to try for another crop.  The problem is light.  If you don't do it early enough, with no supplemental light, then it may not come up. 

Thursday, August 30, 2012

Cheap landscaping projects 2012 - Before and after images


Because of the bees and because of the amount of lawn to mow without gardens and patios, this year I focused on creating more gardens as inexpensively as possible.  Here were this year's projects before and after:

1.  Patio using existing wood chips cost me only the landscape fabric underneath.  I found stone to trim the patio.

before installing inexpensive patio image
Before (spring 2012)


woodchip patio area (summer 2012)
2.  Pathway on the north side of the house was added, again using woodchips and landscape fabric.  The garden to the right more than doubled in size. I purchased a few plants but moved and divided mostly my existing plants to fill the space.


3.  The area in front of the hives was enhanced with a rustic archway and four half circle(ish) gardens with a grass path that divides them.  Over the archway, I planted the gourds for fast growth. Once morning glories are established, they would fill an archway nicely too. Perhaps another year :).

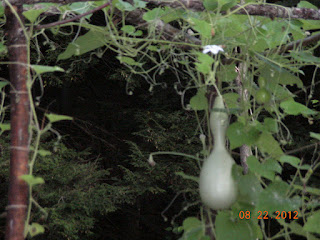
birdhouse gourd growing on rustic archway
Birdhouse gourd growing on rustic archway

4.  This is the beehive area where I moved my cherry,  peach and apple trees where they'd be protected by the electric fence, at least during the summer.  I left another apple tree outside the fenced area  I did get 8 peaches, perfectly ripened and made a peach tart which I then froze and will serve it at Thanksgiving.  I didn't expect anymore fruit this year but am hoping to see a bit more next year.  This is the beginning of the landscaping project.

setting up beehive area and planning the garden - before shot


Spring garden in process


August 2012

The bush on the left is a PeeGee Hydrangaea.   I planted White Alyssum around the edges

Behind that bush I already had the gooseneck loosestrife around the edges and the tall sunflower-like plants there, with a Valerian plant at either side in the back.  I then added a few Cosmos for late fall color.  Those are not in bloom yet...almost. The gooseneck loosestrife is invasive so I've been deadheading the blooms to keep them under control.

On the right, the back garden has a few butterfly bushes toward the back which may need to be moved because it's not getting enough sunlight there.  I'll need to plant something that likes partial shade there next year  I'm actually thinking that a rhododendron might work there.  And I planted creeping thyme around the edge of that garden which blooms pink in the spring so will need a color to coordinate

In the front on the right is mostly annuals with the exception of a Broomstick plant that I'm hoping will take off here.  If it does, it will bloom in yellow in the spring  

The gardens themselves will change over time and I'll try to make them as  carefree as possible...probably using shrubs rather than annuals or perenniels.  But that planning is all part of the fun and it is winter fun so stay tuned for more ideas during the winter.


Monday, August 20, 2012

First year investment for hobby beekeeper

Here's the extraction equipment bundle I purchased this year.  I could have used an extraction service, but chose to have my own equipment.  Local Beekeeping Associations will generally offer an extraction service so every beekeeper doesn't need to go buy their own equipment unless they want to.

Extractor (stainless steel on legs) - reminds me of a salad spinner only a lot bigger.  It stands about 30 inches high and 14 inches round.  Then it attached to some legs so that the part you spin like a salad spinner is at the right level.  Inside go the frames.

Uncapping tank with spout to pour honey out that captures the wax and honey drops below to the spout that you open and close.  There are other types and commercial products but I found this is pretty slick tool for the home beekeepers.

Escape screen
Use a bee brush to gently coax them along and off your frame, or you can put this screen under the super you want to empty to take the honey. Place it there, triangle down and the bees leave from the top of the screen and can't figure out how to get back in. Leave it on for a maximum of 36 hours and you'll have few bees to get off your frames.  (It worked wonderfully) Then you grab the frames, put them into a covered container and get inside where there are no bees to do your extraction. 
This extraction equipment investment cost about $500

Other equipment and clothing and training cost an additional $1000.


August reflections on gardening and keeping out garden pests

Keeping out pests in a garden is one of gardening's biggest challenges.  I think that about a month or so ago...or less, I wrote something about how lovely my tomatoes were.  This photo was taken on July 12th


But then something began to happen.  I noticed large bites out of the tomatoes as soon as they began ripening.  I had to begin picking early so that I'd get a tomato crop.   and my crop has been good...but it could have been better if it weren't for this "large bite out of tomato" situation.


Yesterday, I was in the woods around my house looking for mushrooms, and I saw a couple of green tomatoes with tooth marks on them...like they half attempted to save them, but in the end, dropped..probably knowing there was better fruit to be had in another day or so.

I also think my heirloom pineapple tomato plant tricked them for a while because they were yellowing but not reddening and they escaped getting the bites taken out of them.  But after a few weeks, even they began to have bites. I wondered if the creature(s) determine ripeness via color, or scent or perhaps touch? The photo above is one of the pineapple tomatoes..so this is proof that they've been discovered.

Also the dreaded late season blight hit the tomatoes.  I have struggled with that for a few years, as we all have.  I did purchase some seeds that were resistant but I also had heirlooms which are not  resistant, so the disease came, but it came late.


Late summer blight on tomatoes

About the only thing you can do at this point is to cut off all the dead or diseased leaves and bag them in plastic immediately and then throw them into the trash.  Never throw this onto the compost pile since it will infect plants in coming years.  The disease spreads by spores so you don't want these floating through the air.
I cut them off this morning so the plants look pretty naked.  But sometimes they come back if you cut off all the disease.  Because we should have at least another month of growing season, I will add some fertilizer and see what happens.  I have nothing to lose at this point.


And then cucumber beetles attacked the summer squash and decimated it overnight.  I reached for a pesticide with them because I didn't want to lose my zucchini, cucumbers and melons and pumpkin too! It worked.  The others are still doing ok.  But I lost the summer squash and pulled it and added to the dead tomatoes in plastic.

Then, one morning last week, I look out to see most of my corn flattened to the ground.  I knew this was a bear.  Only a bear would trash the entire area, and I could picture him or her sitting in the middle of all the chaos eating the corn and dropping the cob.
Corn trashed by bear

There is literally nothing left on the corn cob. You know how,when you finish an ear of corn, there's always remnants of the outer kernal left behind?  There is nothing on these cobs.  They were ready to use in decorations, almost dry!  Well, perhaps a slight exaggeration but they were very much cleaned off.

Between, the tomatoes and the bear, and the turkeys, and God knows, the chipmunks and squirrels, I need something to deter them. So I'm planning to put in a fence. For the past few years, a product called Repels All  has worked out really well...it's coyote urine packaged into a powder or spray that you can sprinkle or spray around your garden or plants you want to protect.  It's worked before but not this year.  Maybe because this is the best garden I've had here so far. 

I think I'll buy the fence prior to next spring so it's ready to go. Maybe even within a few weeks. If I can do within a few weeks, it might even save a little of this crop, especially if first frost is very late like it was last year.  I'll include my pear trees within the fenced area too, hoping to help them keep their crop, a small crop, hopefully, next year.

But will a 5-foot wire fence keep out a bear?  Or deer?  It will at least deter them.  If I have to, I'll have to electrify my garden fence too. I just don't want to deal with that with children around, but of course, I will always shut it off when they come. These will be things to think about over the coming days, weeks and months.

Another fall plan is to add a pathway to my front steps, using the wood chips, like I did on the side of the house.  I already started demolition by moving some plants from there to another part of the front yard.  And I want two sections of picket fence out front near the driveway so that plows can't plow snow onto the front lawn. They practically ruined it last year and plowed into this beautiful shrub that, to me at least, is a centerpiece of the lawn. That's a subject for another day.


Sunday, August 12, 2012

A wonderful crop.

Finally, after all the planning and the work involved with this venture, this was the weekend when I  extracted the honey.  Actually last week, I needed to remove two frames from  the deep hive to give them more room for brood.  So I removed two frames of honey and tried the extraction process.  So I had a "taste" of how the process worked.

But yesterday was the day to extract all the honey from the first 10-frame super.  This is my season's crop, along with the honey from the other.  I got at least 3 gallons of honey this year since it's now in a 5-gallon bucket and the honey comes up to within 5 inches of the top of the bucket.


Now the honey will sit in the covered bucket for a week.  This is to allow any air bubbles to dissipate before putting into jars.

I'm very happy with this crop since I had no idea what to expect this first year.  Beekeepers who only bought a package of bees may get nothing this year.  I bought a nuc and did that hoping to get some honey this first year.  It is certainly enough to give as gifts to family, friends and neighbors...plus me, of course!  And next year, increasing to two hives, will give me more and then maybe I can begin selling a bit.

The rest of the honey in the hive is for the bees during the winter.  So now, I will just keep giving them sugar syrup and they will fill up those two frames during the remainder of the season.  And I will begin to gather hay, roofing paper to begin preparing some insulation for the winter.

Once the bear go into hibernation, I can also take down the electric fence for the winter and bring it inside. They recommend not leaving it in an unheated shed because it won't last as long.

Ouch, ouch, ouch
Of course, live and learn. With my new beekeepers suit that looks like a space suit, I had bees flying all around me.  They weren't all that happy about me taking their honey!  I did not get stung.

After the extraction, I had been told that the bees will clean off all the honey from the extracted frames so I decided to go put them back into the empty super.  Which I did.  The bees loaded these frames immediately to clean them off.  But when I lifted it to place on top of the other super on the hive, it had a big gap...I had put the frames in an upside down box so I had to remove them all and flip over the box.

The bees went crazy and found my weakness...just where the sock goes into the sneaker is a vulnerable spot.   Basically it's the only spot that isn't covered by something that keeps bees from getting to your skin.  So I got stung around the ankles several times.  Sigh.  They swelled up last night and are very itchy at this moment.

But other than that, it all went very smoothly.

Then that big extractor needed to be cleaned so it went into the shower with me!

Steps to extracting honey

1. Purchase a triangle board and put it triangle side down under the super where you want to take the honey.
With this board, the bees leave the super and can't get back it.  It honestly worked.  I put it on at 5:00 PM Friday night and went to get the bees at around noon on Saturday.  There were only a handful of bees left on the frames so I used a bee brush to brush them off and put the frame into the big plastic bucket used for uncapping and quickly covered it.  Until all the 10 frames were in the covered sstorage-like container.  I had placed the bucket on a little red wagon and wheeled it over to the porch.  I then slid the container onto the porch, put the wagon on the porch, lifted the bucket back onto the wagon, and right into the kitchen where the uncapping took place.

2.  Uncap each of the frames.  You can use a hot knife for this, but because I had 10 frames in the hive, the comb wasn't built out beyond the frames so an uncapping tool is what I used.  It's a pronged tool that looks like this:

You put your full frame of honey over this extraction tank that comes in three pieces.  A cover, a bucket with a metal slatted bottom to catch the wax but allow the honey to flow into the bottom bank that has a spout.

 The piece of wood you see across the top if this has a screw in the middle that you rest the frame on as you are running the comb down over the frame to allow the honey to flow.

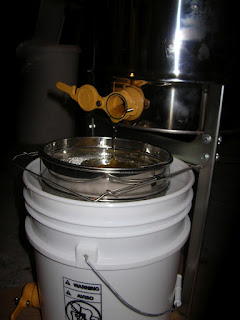
The top tank above fits into the bottom bank below.


Once the frames are uncapped, they are ready for the Extractor.  My extractor holds 3 frames, it seems, since I couldn't seem to make it hold 6.  You spin it for a few minutes and the honey flows to the bottom of the tank.  Then, when you're done, you open the flow into a double strainer to strain out any wax capping, etc. and the final product is now in the bucket.
honey extractor
filtering honey into 5-gallon bucket with spout for pouring after honey sits for about a week


filtering honey
Filtering the honey through two sieves


I have let the cappings strain into the lower tank all night so that today I will strain that little bit more honey into my bucket and it will rest there for a week or so.  Then I will bottle it.  I have been saving jars to recycle for this purpose to I will use what I have.  I also have some small jelly jars that will be useful.  What fun it will be to see these all up on a shelf.


Monday, July 23, 2012

Making a nuc

Yesterday...which was at least a few weeks ago when I began this entry...I've just been so busy that I haven't had time to write:

Anyway, I made a nuc from my hive.  It was my first time, as all of this is my first time, so I'm sure I stressed out the bees more than I needed to.  But it's done now and I can only hope for the best.

I got to the bottom hive yesterday for the first time in a month and lifted every frame and cleaned off burr comb that was in odd places.  I saw some brood, pollen and nector....and larvae so that I can be pretty sure I still have a working queen in there. Unless it took off in all the commotion yesterday while I was doing this work in the hive.

I also looked in the upper deep hive which is jammed with honey.  I saw very little brood in there and think that next time, I may need to do something about that but for now, I did nothing with that since I had other work to do.

My one super...where I get my honey...is almost full so I added another super and that will give the bees more space to build it out and make honey.  There seems to be enough in bloom so that they can get enough nectar and pollen to work with.  The hive is getting tall!


This is what it looked like yesterday after my work was completed.  They spent the rest of the evening outside trying to recover from the trauma of my messing with their hive.

To start the nuc, you take about 3 frames from the brood chamber at the bottom.  You want to make sure you insert frames that have brood, eggs or tiny larvae, nectar and pollen.  With those ingredients, they will make their own queen within a few weeks.  With this nuc, I only want it to be strong enough to survive the winter and then in the spring, I will add the five frames to a new hive...and not have to spend the money on purchasing a nuc from someone else.  We'll see.

Next thing I needed to do is move the nuc a few miles from my home.  Otherwise, the bees would just go back to their original hive (their home) rather than make the nuc their home.  So I drove it up to my daughter's land and found a great spot there with lots of wildflowers around...and away from the family.


Notice the orange wheel in the front.  That spins around so that you can open it fully to give bees full access to come and go.  But there could be stealing from other bees so I opened only one of the holes to minimize the threat.  It's secured with a wingnut in the center.

This morning, I needed to take the nuc away from here and so lifted it and placed it on the floor of the backseat of my car.  All of a sudden, I see bees everywhere!  I hadn't secured the front! So they were flying at me, all over the car.  I ran in, donned my beekeepers hat, veil, gloves, and ran back out to close up the opening.  A bee got up my pant leg so I stripped them off getting just one sting.  Then I decided I needed long pants and socks to tuck my pants into.  Then I went back out to deal with it.  I started my smoker.  Then tightened the wingnut so it was closed. The bees then went into my trunk, just in case there were a few I missed crawling on the outside of the box.  You can see I used duck tape to secure the top.  Then I drove them about 5 miles away.

Wow, that's a lot of adrenaline for first thing in the morning!  I doubt I'll ever forget to tighten the wingnut again. :)

I picked up this hive from my daughter's land and it was all intact.  It was there for a few weeks.  Now it's back here next to my more mature hive and I've added a feeder to the top of it as well.  I need to pick up some cement blocks to set it on.  Right now, it's on a tree stump but it isn't secure enough to my liking.

Saturday, July 21, 2012

Splitting the hive and adding a super

It's July 18th, 2012. I got up to a few of three deer in my yard.  One in the lower pond, one at my blueberry bushes which explains why I didn't get one blueberry this year, and then another down by the birdhouse.  I grabbed my camera and took great shots, but none came out.  I can get a great photo in my kitchen but through the screen, it comes out a gray blank image.  Darn because they were so close and only ran when they heard me snap the last photo. Next time, I'll need to quietly step out onto the front porch to get an unobstructed shot.

Well, the very next morning, I looked out my bedroom window to see a couple of deer in my backyard.  This time, I quietly sneaked around the side of the house and got this wonderful shot!


As for the blueberries, next year, I will build a shelter for them with 4 posts and netting over the posts that drape over the bushes too..I've seen others do that and it seems to work.  Left alone, the animals eat the blueberries (and bushes) before you can get to them.  Live and learn!  I may have to move the bushes though. It will obstruct my view down the hill to the birdhouse which now has gourds flowering unless I can figure out some attractive way to do it..which is doubtful. I've been thinking that I'd like to see some evergreen shrub in the area so I will be thinking about that for the future.

I have to laugh at the unrealistic expectations I personally start out with year after year.  I suppose it's like this with other gardeners too...you expect everything you do to be in peak condition, lush, with no insect or other disease damage.  But it's never perfect.  I suppose that if it were. there would be nothing left to do and what's the fun of that?  But some things surprise you and sometimes surpass your expectations.  I can't speak of my beautiful tomatoes this year..knock on wood...I don't want to jinx them.


Over by the beehive, my little rustic archway has gourds blooming.  I will try to get a shot of this early evening...or as soon as I see the flowers open. It was pretty last night and will get much more filled in over the next few months until the frost gets it. Gosh, I don't want to think about that right now!
I sure hope this turns out to be as lush as my imagination saw it.  It's coming along and it now, at least, catches the eye.


I've been busy trying to figure out what to do with the hive.  It's been difficult to not go in for an extra week. I believe I have a super filled with honey, or at least some frames should be filled.  I'm ready to add on the second super this weekend.

The other chore this weekend is to get into that bottom hive and pull out some frames to see what's going on.  I fear there is comb being built that needs to come off and I need to make sure I have a healthy queen who is laying eggs.  If I see that....then I'm planning to split the hive and make a Nuc so that next year I won't have to buy one to start my second hive.  More on that later.

Let me just say this. Yes, I want another hive.  I'm told that I can start a Nuc now and winter it over (I need to learn more about how to do this...seems like they'd freeze in such a small box for the winter).  Then, in the spring, I will use that to start my second hive. But that's for discussion later on.

Right now I need to focus on extracting the honey.  And I've order what I need and the various items are being shipped. I ordered all the extraction products I need with high hopes that I'll have honey to extract.  It does seem like I will but until it's in the jar....

More on extraction next time. I'm finding this to be a very busy time so apologize if I bounce from subject to subject in these posts. It's how I am in the yard too, bouncing from task to task. :)

Thursday, July 12, 2012

Air in the hive makes all the difference

If you recall a few weeks or so ago, the bees were all hanging outside the hive.   For a while, I thought they were going to swarm, but it was because they were so hot inside. I did two things to help them, inserting a stick or rock under the top cover lets in air, and I removed the entrance reducer. Between those two actions, what a difference!  I haven't seen this kind of scenario again so now the bees can concentrate on gathering.

In the interest of full disclosure, my grandson got stung in my yard last week. We were hand picking japanese beetles off some plants on that side of the house but not really near the hive. Rather than spray them with poison, I pick them off and drop them into a can of water and then cover them. Cruel but safer then pesticides.  He was helping me.

Somehow a bee found him and stung him on the.  I am not sure why but there may have been a bee in the clover that he stepped on.  He was very brave after the shock wore off!

It happens.  I refuse to give in to a few bee stings but family will be better off on the other side of the house where the hive isn't.

Bees message received

Well, I was stung again this past weekend...twice.  I tried (in vain) to get into the bottom deep hive where all the brood created and maintained.  As soon as I moved off the box (another deep hive that is full of their honey) they went crazy!

I had bees flying all around me thinking I might be taking something from them.  But I only wanted to look at the frames down there to see if 1) the queen is still alive and well and if she is 2) to see the eggs and 3) to see if  the bees that are growing are worker bees, or drones.  But the frames were pretty well stuck together.  After trying several time to get the first frame removed so I could have room to look at a few more, I gave up.  I had been stung twice and it was only a matter of time before they found a few other vulnerable parts on my body.

I guess I really need to invest the $139 to buy a full bee suit which the bees can't sting through.  I try to have two top layers (on a hot day, it gets really, hot in two layers) but they can still sting through that.  I had on thick wool socks  and they found their way through the sock right at my ankle.

Other than the itching, it wasn't so bad.  I hardly swelled up at all this time.  But each of the areas itched a lot.  The first 4 stings I got a few weeks ago stayed with me for all this time...only today I can't find them on my legs. For the past 3 weeks or so, I could see a thumbprint size of red (two of them actually) on my leg.

I had read, and also was told my my instructors from Swanzey, NH, Imagine that Honey, that the body will build up an immunity to the strings.  I didn't think it would happen this quickly but was glad they didn't last like the first ones did.

The bottom line is that they  need to be left alone right now.  I have heard (and felt) their message.  We all feel that way at times.  And this is their time. They are very busy making honey and they know what they are doing.  They do not need me looking over their shoulder!

I will continue to add sugar syrup every 3-4 days to keep them going during the hottest part of the summer when the burst of spring pollen as a source of food has passed.  They need that help. I will keep their water filled and fresh.

Then I need to monitor the top super to see when they have filled  7 frames with honey.  Then I'll want to add on one more super. 

Overall, the bees seem to be thriving.  There are a LOT of bees now, and all seems to be normal.  The super that is there now was close to half filled, I think, so perhaps next week, I can add one more box.  I will need to monitor when to add that last super.  And by the time they fill the second and last super, it will most likely be fall. However, I wonder if I should have one extra on hand...but that's probably way too optimistic :).

My next entry will focus on purchasing extracting equipment.  Another investment made this week. If things continue...that process is not too far away.

Sunday, July 1, 2012

I see honey being made

As I did a quick inspection today, the new super I added last week has honey in it already.  The bees are building comb and honey was loaded inside!  I removed just one frame, and pulled out the third frame to inspect and that's where I saw the honey.  It's still pretty clear.   Apparently that's how it starts out and then mellows into various golden colors, depending on the pollen they carry into the hive.

Then I went down into highest deep hive when the bees began buzzing all around me.  I think that they were protecting their food source.  Because they seemed especially protective today, like a few weeks ago, I decided to cut my inspection short and I didn't go into the bottom deep hive at all.  I'd already been there for more than the 10 minute maximum.  But I need to get to that bottom deep to see if I have a queen and new eggs but for now, I'm going to stay positive and let them do their job.  Things look active everywhere else and surely productive so I'm hoping there's a queen down there and that everything is AOK

Next time I will try to do the bottom hive first.  (I fear I said the same thing last week)

All this honey is making me think of the next step in this beekeeping process.  I'm beginning to look at honey extracting equipment because I'll want to have what I need on hand when the time comes.  I will begin putting an order together.  If I decide to purchase it all, it'll probably be another good sized investment in the $300 - $400 range based on some window shopping.

Another side note...the beeswax candles I made last week burned beautifully last night. I decided to try one of the smaller ones first because I didn't use a weight on the wick so wasn't too sure if those would burn well.  But this one did so I should be set to make more of these candles very soon.  I'm collecting any beeswax I clean off the hive weekly, but today there wasn't that much to take.  I'll get most of the wax when I extract the honey.  That should give me a bunch to play with making candles and perhaps some soap and lotion

A patio for 40 dollars

I think I mentioned recently about my plan to put in a patio outside the porch ...one that looks better than just grass that constantly needs to be mowed, and heavy chairs always needing to be moved so I could mow. And it never looking neat because it also needed weedwacking in between mowings and I just  never got around to doing it.

I would have liked an old brick patio and even went so far as contacting the mason who built me the masonry heater that heats my house, also finished in brick.  But before he showed up to look at the job, I had another, cheaper idea.

With this pile of woodchips I have from trees removed this spring, I decided I would go buy some landscape fabric, cover the patio area with the fabric, and then cover the fabric with wood chips.  Then I'd trim it with the stone from the beginnings of a field stone patio, but reality told me that it wasn't going to work out as something I could do myself.  And it looked terrible.  So I decided to use some of the wood chips.  This photo was taken after I had done the patio so you can see I still have a few left over :). 


Before the patio


The 40 dollar patio


The pond is in front of the chairs. From the top step or from the porch, you can see over the chairs and still see the pond.


Here's another angle..  I've already move somethings around and added more plants but this is basically what I see today.  I'm very satisfied with the solution and it feels like a good way to recycle materials back into the land.


I made this little stone area, cleaning out a few plants, so that the kids and I can get right up close to the pond without me saying "don't  step on the plants" 40 zillion times. I think it will work out...again, for now. A garden seems to always be a work in progress.

One note about my $40 patio.  I only took into account the two rolls of landscape fabric I bought. Having the trees cut by professionals obviously cost me some money.  But I kept the wood for burning and the wood chips for use around the yard so I was able to recoup some of the money I spent having them taken down.