Thursday, August 30, 2012

Cheap landscaping projects 2012 - Before and after images


Because of the bees and because of the amount of lawn to mow without gardens and patios, this year I focused on creating more gardens as inexpensively as possible.  Here were this year's projects before and after:

1.  Patio using existing wood chips cost me only the landscape fabric underneath.  I found stone to trim the patio.

before installing inexpensive patio image
Before (spring 2012)


woodchip patio area (summer 2012)
2.  Pathway on the north side of the house was added, again using woodchips and landscape fabric.  The garden to the right more than doubled in size. I purchased a few plants but moved and divided mostly my existing plants to fill the space.


3.  The area in front of the hives was enhanced with a rustic archway and four half circle(ish) gardens with a grass path that divides them.  Over the archway, I planted the gourds for fast growth. Once morning glories are established, they would fill an archway nicely too. Perhaps another year :).
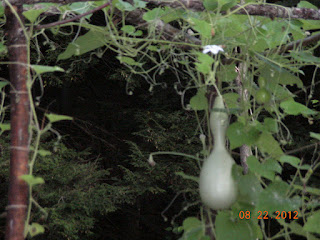
birdhouse gourd growing on rustic archway
Birdhouse gourd growing on rustic archway

4.  This is the beehive area where I moved my cherry,  peach and apple trees where they'd be protected by the electric fence, at least during the summer.  I left another apple tree outside the fenced area  I did get 8 peaches, perfectly ripened and made a peach tart which I then froze and will serve it at Thanksgiving.  I didn't expect anymore fruit this year but am hoping to see a bit more next year.  This is the beginning of the landscaping project.

setting up beehive area and planning the garden - before shot


Spring garden in process


August 2012

The bush on the left is a PeeGee Hydrangaea.   I planted White Alyssum around the edges

Behind that bush I already had the gooseneck loosestrife around the edges and the tall sunflower-like plants there, with a Valerian plant at either side in the back.  I then added a few Cosmos for late fall color.  Those are not in bloom yet...almost. The gooseneck loosestrife is invasive so I've been deadheading the blooms to keep them under control.

On the right, the back garden has a few butterfly bushes toward the back which may need to be moved because it's not getting enough sunlight there.  I'll need to plant something that likes partial shade there next year  I'm actually thinking that a rhododendron might work there.  And I planted creeping thyme around the edge of that garden which blooms pink in the spring so will need a color to coordinate

In the front on the right is mostly annuals with the exception of a Broomstick plant that I'm hoping will take off here.  If it does, it will bloom in yellow in the spring  

The gardens themselves will change over time and I'll try to make them as  carefree as possible...probably using shrubs rather than annuals or perenniels.  But that planning is all part of the fun and it is winter fun so stay tuned for more ideas during the winter.


Monday, August 20, 2012

First year investment for hobby beekeeper

Here's the extraction equipment bundle I purchased this year.  I could have used an extraction service, but chose to have my own equipment.  Local Beekeeping Associations will generally offer an extraction service so every beekeeper doesn't need to go buy their own equipment unless they want to.

Extractor (stainless steel on legs) - reminds me of a salad spinner only a lot bigger.  It stands about 30 inches high and 14 inches round.  Then it attached to some legs so that the part you spin like a salad spinner is at the right level.  Inside go the frames.

Uncapping tank with spout to pour honey out that captures the wax and honey drops below to the spout that you open and close.  There are other types and commercial products but I found this is pretty slick tool for the home beekeepers.

Escape screen
Use a bee brush to gently coax them along and off your frame, or you can put this screen under the super you want to empty to take the honey. Place it there, triangle down and the bees leave from the top of the screen and can't figure out how to get back in. Leave it on for a maximum of 36 hours and you'll have few bees to get off your frames.  (It worked wonderfully) Then you grab the frames, put them into a covered container and get inside where there are no bees to do your extraction. 
This extraction equipment investment cost about $500

Other equipment and clothing and training cost an additional $1000.


August reflections on gardening and keeping out garden pests

Keeping out pests in a garden is one of gardening's biggest challenges.  I think that about a month or so ago...or less, I wrote something about how lovely my tomatoes were.  This photo was taken on July 12th


But then something began to happen.  I noticed large bites out of the tomatoes as soon as they began ripening.  I had to begin picking early so that I'd get a tomato crop.   and my crop has been good...but it could have been better if it weren't for this "large bite out of tomato" situation.


Yesterday, I was in the woods around my house looking for mushrooms, and I saw a couple of green tomatoes with tooth marks on them...like they half attempted to save them, but in the end, dropped..probably knowing there was better fruit to be had in another day or so.

I also think my heirloom pineapple tomato plant tricked them for a while because they were yellowing but not reddening and they escaped getting the bites taken out of them.  But after a few weeks, even they began to have bites. I wondered if the creature(s) determine ripeness via color, or scent or perhaps touch? The photo above is one of the pineapple tomatoes..so this is proof that they've been discovered.

Also the dreaded late season blight hit the tomatoes.  I have struggled with that for a few years, as we all have.  I did purchase some seeds that were resistant but I also had heirlooms which are not  resistant, so the disease came, but it came late.


Late summer blight on tomatoes

About the only thing you can do at this point is to cut off all the dead or diseased leaves and bag them in plastic immediately and then throw them into the trash.  Never throw this onto the compost pile since it will infect plants in coming years.  The disease spreads by spores so you don't want these floating through the air.
I cut them off this morning so the plants look pretty naked.  But sometimes they come back if you cut off all the disease.  Because we should have at least another month of growing season, I will add some fertilizer and see what happens.  I have nothing to lose at this point.


And then cucumber beetles attacked the summer squash and decimated it overnight.  I reached for a pesticide with them because I didn't want to lose my zucchini, cucumbers and melons and pumpkin too! It worked.  The others are still doing ok.  But I lost the summer squash and pulled it and added to the dead tomatoes in plastic.

Then, one morning last week, I look out to see most of my corn flattened to the ground.  I knew this was a bear.  Only a bear would trash the entire area, and I could picture him or her sitting in the middle of all the chaos eating the corn and dropping the cob.
Corn trashed by bear

There is literally nothing left on the corn cob. You know how,when you finish an ear of corn, there's always remnants of the outer kernal left behind?  There is nothing on these cobs.  They were ready to use in decorations, almost dry!  Well, perhaps a slight exaggeration but they were very much cleaned off.

Between, the tomatoes and the bear, and the turkeys, and God knows, the chipmunks and squirrels, I need something to deter them. So I'm planning to put in a fence. For the past few years, a product called Repels All  has worked out really well...it's coyote urine packaged into a powder or spray that you can sprinkle or spray around your garden or plants you want to protect.  It's worked before but not this year.  Maybe because this is the best garden I've had here so far. 

I think I'll buy the fence prior to next spring so it's ready to go. Maybe even within a few weeks. If I can do within a few weeks, it might even save a little of this crop, especially if first frost is very late like it was last year.  I'll include my pear trees within the fenced area too, hoping to help them keep their crop, a small crop, hopefully, next year.

But will a 5-foot wire fence keep out a bear?  Or deer?  It will at least deter them.  If I have to, I'll have to electrify my garden fence too. I just don't want to deal with that with children around, but of course, I will always shut it off when they come. These will be things to think about over the coming days, weeks and months.

Another fall plan is to add a pathway to my front steps, using the wood chips, like I did on the side of the house.  I already started demolition by moving some plants from there to another part of the front yard.  And I want two sections of picket fence out front near the driveway so that plows can't plow snow onto the front lawn. They practically ruined it last year and plowed into this beautiful shrub that, to me at least, is a centerpiece of the lawn. That's a subject for another day.


Sunday, August 12, 2012

A wonderful crop.

Finally, after all the planning and the work involved with this venture, this was the weekend when I  extracted the honey.  Actually last week, I needed to remove two frames from  the deep hive to give them more room for brood.  So I removed two frames of honey and tried the extraction process.  So I had a "taste" of how the process worked.

But yesterday was the day to extract all the honey from the first 10-frame super.  This is my season's crop, along with the honey from the other.  I got at least 3 gallons of honey this year since it's now in a 5-gallon bucket and the honey comes up to within 5 inches of the top of the bucket.


Now the honey will sit in the covered bucket for a week.  This is to allow any air bubbles to dissipate before putting into jars.

I'm very happy with this crop since I had no idea what to expect this first year.  Beekeepers who only bought a package of bees may get nothing this year.  I bought a nuc and did that hoping to get some honey this first year.  It is certainly enough to give as gifts to family, friends and neighbors...plus me, of course!  And next year, increasing to two hives, will give me more and then maybe I can begin selling a bit.

The rest of the honey in the hive is for the bees during the winter.  So now, I will just keep giving them sugar syrup and they will fill up those two frames during the remainder of the season.  And I will begin to gather hay, roofing paper to begin preparing some insulation for the winter.

Once the bear go into hibernation, I can also take down the electric fence for the winter and bring it inside. They recommend not leaving it in an unheated shed because it won't last as long.

Ouch, ouch, ouch
Of course, live and learn. With my new beekeepers suit that looks like a space suit, I had bees flying all around me.  They weren't all that happy about me taking their honey!  I did not get stung.

After the extraction, I had been told that the bees will clean off all the honey from the extracted frames so I decided to go put them back into the empty super.  Which I did.  The bees loaded these frames immediately to clean them off.  But when I lifted it to place on top of the other super on the hive, it had a big gap...I had put the frames in an upside down box so I had to remove them all and flip over the box.

The bees went crazy and found my weakness...just where the sock goes into the sneaker is a vulnerable spot.   Basically it's the only spot that isn't covered by something that keeps bees from getting to your skin.  So I got stung around the ankles several times.  Sigh.  They swelled up last night and are very itchy at this moment.

But other than that, it all went very smoothly.

Then that big extractor needed to be cleaned so it went into the shower with me!

Steps to extracting honey

1. Purchase a triangle board and put it triangle side down under the super where you want to take the honey.
With this board, the bees leave the super and can't get back it.  It honestly worked.  I put it on at 5:00 PM Friday night and went to get the bees at around noon on Saturday.  There were only a handful of bees left on the frames so I used a bee brush to brush them off and put the frame into the big plastic bucket used for uncapping and quickly covered it.  Until all the 10 frames were in the covered sstorage-like container.  I had placed the bucket on a little red wagon and wheeled it over to the porch.  I then slid the container onto the porch, put the wagon on the porch, lifted the bucket back onto the wagon, and right into the kitchen where the uncapping took place.

2.  Uncap each of the frames.  You can use a hot knife for this, but because I had 10 frames in the hive, the comb wasn't built out beyond the frames so an uncapping tool is what I used.  It's a pronged tool that looks like this:

You put your full frame of honey over this extraction tank that comes in three pieces.  A cover, a bucket with a metal slatted bottom to catch the wax but allow the honey to flow into the bottom bank that has a spout.

 The piece of wood you see across the top if this has a screw in the middle that you rest the frame on as you are running the comb down over the frame to allow the honey to flow.

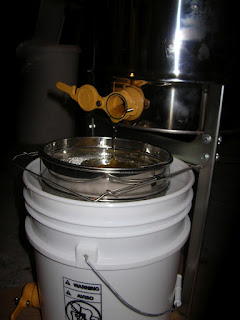
The top tank above fits into the bottom bank below.


Once the frames are uncapped, they are ready for the Extractor.  My extractor holds 3 frames, it seems, since I couldn't seem to make it hold 6.  You spin it for a few minutes and the honey flows to the bottom of the tank.  Then, when you're done, you open the flow into a double strainer to strain out any wax capping, etc. and the final product is now in the bucket.
honey extractor
filtering honey into 5-gallon bucket with spout for pouring after honey sits for about a week


filtering honey
Filtering the honey through two sieves


I have let the cappings strain into the lower tank all night so that today I will strain that little bit more honey into my bucket and it will rest there for a week or so.  Then I will bottle it.  I have been saving jars to recycle for this purpose to I will use what I have.  I also have some small jelly jars that will be useful.  What fun it will be to see these all up on a shelf.